Build the Substrate Kitties Chain
Welcome to the Substrate Kitties workshop. This workshop is split into two separate parts, designed to teach you everything you need to know about building a blockchain that handles the creation and ownership management of Substrate Kitties.
Part I will cover how to build the Kitties pallet, including the functionality to interact with the Kitties we create, such as transferring, buying and setting prices. Part II will cover developing the Front-end UI to interact with the blockchain we build in Part I.
Tutorial objectives
- Learn basic patterns for building and running a Substrate node.
- Write and integrate a custom FRAME pallet to your runtime.
- Learn how to create and update storage items.
- Write pallet extrinsics and helper functions.
- Use the PolkadotJS API to connect a Substrate node to a custom a front-end.
This tutorial assumes that you have already installed the prerequisites for building with Substrate on your machine. If you haven't already, head over to our installation guide.
What we're building
In Part I of this tutorial, we'll intentionally keep things simple so that you can decide on how you'd like to improve your Substrate Kitties chain later on. For the purposes of what we're building, Kitties really can only do the following things:
Be created either by some original source or by being bred using existing Kitties.
Be sold at a price set by their owner.
Be transferred from one owner to another.
What we won't cover
The following items fall outside the scope of this tutorial:
- Writing tests for our pallet.
- Using correct weight values
You can refer to the how-to guides on how to integrate these once you've completed this workshop.
Follow each step at your own pace — the goal is for you to learn and the best way to do that is to try it yourself!
Before moving on from one section to the next, make sure your pallet builds without any error. You'll be writing most of the code yourself! Use the template files here to help you complete each part.
If you are stuck in following the tutorial, refer to the complete source code at:
- On Substrate end, Substrate Node Template repository
tutorials/kittiesbranch. Most of the code changes are under/pallets/kitties/src/lib.rs. - On front end, Substrate Front-end Template repository
tutorials/kittiesbranch. Most of the code changes are within these three files:/src/[Kitties.js, KittyCards.js, KittyAvatar.js].
Basic set-up
Before we can start making Kitties, we first need to do a little groundwork. This part covers the basic patterns involved with using the Substrate Node Template to set up a custom pallet and include a simple storage item.
Set-up your template node
The Substrate Node Template provides us with an "out-of-the-box" blockchain node. Our biggest advantage in using it are that both networking and consensus layers are already built and all we need to focus on is building out the logic of our runtime and pallets. Before we get there, we need to set-up our project in terms of naming and dependencies.
We'll use a CLI tool called kickstart to easily rename our node template. Install it by
running cargo install kickstart.
Once kickstart is installed, in the root directory of your local workspace run the following command:
kickstart https://github.com/sacha-l/kickstart-substrate
This command will clone a copy of the most recent Node Template and ask how you would like to call your node and pallet. Type in:
kitties- as the name of our node. The node will be named asnode-kitties.kitties- as the name of your pallet. The pallet will be named aspallet-kitties.
This will create a directory called kitties with a copy of the Substrate Node Template
containing the name changes that correspond our template node, runtime, and pallet.
Open the kitties directory in your favorite code editor and rename it as kitties-tutorial.
Renaming this directory will be helpful once you start creating other projects with the node
template — it'll help keep things organized!
Notice the directories that the kickstart command modified:
- `/node/` - This contains all the logic that allows your node to interact with your runtime and RPC clients.
- `/pallets/` - Here's where all your custom pallets live.
- `/runtime/` - This is where all pallets (both custom "internal" and "external" ones) are aggregated and implemented for the chain's runtime.
You'll also notice that the instance of our modified template pallet name remains
TemplateModule. Change it to SubstrateKitties (in runtime/src/lib.rs) and add
Config<T> to the pallet declaration:
construct_runtime!(
    pub enum Runtime where
    Block = Block,
    NodeBlock = opaque::Block,
    UncheckedExtrinsic = UncheckedExtrinsic
    {
        // --snip
        SubstrateKitties: pallet_kitties::{Pallet, Call, Config<T>, Storage, Event<T>}, // <-- add this line
    }
);
Write the pallet_kitties scaffold
We'll be spending most of this tutorial in the pallets directory of our template node. Let's take
a glance at the folder structure in our workspace:
kitties-tutorial           <--  The name of our project directory
|
+-- node
|
+-- pallets
|   |
|   +-- kitties
|       |
|       +-- Cargo.toml
|       |
|       +-- src
|           |
|           +-- benchmarking.rs     <-- Remove file
|           |
|           +-- lib.rs              <-- Remove contents
|           |
|           +-- mock.rs             <-- Remove file
|           |
|           +-- tests.rs            <-- Remove file
|
+-- Cargo.toml
You can go ahead and remove
benchmarking.rs,mock.rsandtests.rs. We won't be learning about using these in this tutorial. Have a look at this how-to guide if you're curious to learn how testing works.
Pallets in Substrate are used to define runtime logic. In our case, we'll be creating a single pallet that manages all of the logic of our Substrate Kitties application.
Let's lay out the basic structure of our pallet by outlining the parts inside
pallets/mykitties/src/lib.rs.
Notice that our pallet's directory pallets/kitties/ is not the same as our pallet's name. The name
of our pallet as Cargo understands it is pallet-kitties.
Every FRAME pallet has:
- A set of
frame_supportandframe_systemdependencies. - Required attribute macros (i.e. configuration traits, storage items and function calls).
We'll be updating additional dependencies as we progress through the next parts of this tutorial.
Here's the most bare-bones version of the Kitties pallet we will be building in this tutorial. It contains the starting point for adding code for the next sections of this tutorial. Just like the helper files for this tutorial, it contains comments marked with TODO to indicate code we will be writing later, and ACTION to indicate code that will be written in the current section.
Paste the following code in /pallets/kitties/src/lib.rs:
#![cfg_attr(not(feature = "std"), no_std)]

pub use pallet::*;

#[frame_support::pallet]
pub mod pallet {
    use frame_support::{sp_runtime::traits::{Hash, Zero},
                        dispatch::{DispatchResultWithPostInfo, DispatchResult},
                        traits::{Currency, ExistenceRequirement, Randomness},
                        pallet_prelude::*};
    use frame_system::pallet_prelude::*;
    use sp_io::hashing::blake2_128;

    // TODO Part II: Struct for holding Kitty information.

    // TODO Part II: Enum and implementation to handle Gender type in Kitty struct.

    #[pallet::pallet]
    #[pallet::generate_store(trait Store)]
    pub struct Pallet<T>(_);

    /// Configure the pallet by specifying the parameters and types it depends on.
    #[pallet::config]
    pub trait Config: frame_system::Config {
        /// Because this pallet emits events, it depends on the runtime's definition of an event.
        type Event: From<Event<Self>> + IsType<<Self as frame_system::Config>::Event>;

        /// The Currency handler for the Kitties pallet.
        type Currency: Currency<Self::AccountId>;

        // TODO Part II: Specify the custom types for our runtime.

    }

    // Errors.
    #[pallet::error]
    pub enum Error<T> {
        // TODO Part III
    }

    #[pallet::event]
    #[pallet::generate_deposit(pub(super) fn deposit_event)]
    pub enum Event<T: Config> {
        // TODO Part III
    }

    // ACTION: Storage item to keep a count of all existing Kitties.

    // TODO Part II: Remaining storage items.

    // TODO Part III: Our pallet's genesis configuration.

    #[pallet::call]
    impl<T: Config> Pallet<T> {

        // TODO Part III: create_kitty

        // TODO Part III: set_price

        // TODO Part III: transfer

        // TODO Part III: buy_kitty

        // TODO Part III: breed_kitty
    }

    // TODO Parts II: helper function for Kitty struct

    impl<T: Config> Pallet<T> {
        // TODO Part III: helper functions for dispatchable functions

        // TODO: increment_nonce, random_hash, mint, transfer_from

    }
}
Now try running the following command to build your pallet. We won't build the entire chain just yet
because we haven't yet implemented the Currency type in our runtime. At least we can check that there
are no errors in our pallet so far:
cargo build -p pallet-kitties
Check that you're using the correct monthly-* tag and version otherwise you will get a
dependency error. Here, we're using the monthly-2021-10 tag of Substrate.
You'll notice the Rust compiler giving you warnings about unused imports. That's fine! Just ignore them — we're going to be using those imports in the later parts of the tutorial.
Add storage items
Let's start add the most simple logic we can to our runtime: a function that stores a variable in runtime.
To do this we'll use StorageValue from Substrate's
storage API which is a trait that depends on the storage macro.
All that means for our purposes is that for any storage item we want to declare, we must include the
#[pallet::storage] macro beforehand. Learn more about declaring storage items here.
In pallets/kitties/src/lib.rs, replace the ACTION line with:
#[pallet::storage]
#[pallet::getter(fn kitty_cnt)]
/// Keeps track of the number of Kitties in existence.
pub(super) type KittyCnt<T: Config> = StorageValue<_, u64, ValueQuery>;
This creates a storage item for our pallet to keep track of the total count of Kitties in existence.
Add Currency implementation
Before we proceed with building our node, we need to add the Currency type to our pallet's runtime
implementation. In runtime/src/lib.rs, add the following:
impl pallet_kitties::Config for Runtime {
    type Event = Event;
    type Currency = Balances; // <-- Add this line
}
Now build your node and make sure you don't have any errors. This will take a little while at first.
cargo build --release
You've completed the first part of this series. At this stage, you've learnt the various patterns for:
- Customizing the Substrate Node Template and including a custom pallet.
- Building a Substrate chain and checking that a target pallet compiles.
- Declaring a single value
u64storage item.
Uniqueness, custom types and storage maps
This section dives into some pillar concepts for developing pallets with FRAME
(Framework for Runtime Aggregation of Modularized Entities), incuding writing a storage
struct and implementing the randomness trait
. On top of learning how to use existing types and traits,
you'll learn how create your own types like providing your pallet with a Gender type. At the
end of this part, you will have implemented the remaining two storage items according to the logic
outlined for the Substrate Kitty application in the overview of this tutorial.
We added additional comments to the code from Part I in a dedicated helper file to better assist you with the action items of this section. To follow each step with ease, you can just replace your code with the helper code provided below:
If you're feeling confident, you can use the code from the previous part and use the comments marked as "TODO" to follow each step instead of pasting in the helper file for this part.
#![cfg_attr(not(feature = "std"), no_std)]

pub use pallet::*;

#[frame_support::pallet]
pub mod pallet {
    use frame_support::pallet_prelude::*;
    use frame_system::pallet_prelude::*;
    use frame_support::{
        sp_runtime::traits::Hash,
        traits::{ Randomness, Currency, tokens::ExistenceRequirement },
        transactional
    };
    use sp_io::hashing::blake2_128;

    #[cfg(feature = "std")]
    use serde::{Deserialize, Serialize};

    // ACTION #1: Write a Struct to hold Kitty information.

    // ACTION #2: Enum declaration for Gender.

    // ACTION #3: Implementation to handle Gender type in Kitty struct.

    #[pallet::pallet]
    #[pallet::generate_store(pub(super) trait Store)]
    pub struct Pallet<T>(_);

    /// Configure the pallet by specifying the parameters and types it depends on.
    #[pallet::config]
    pub trait Config: frame_system::Config {
        /// Because this pallet emits events, it depends on the runtime's definition of an event.
        type Event: From<Event<Self>> + IsType<<Self as frame_system::Config>::Event>;

        /// The Currency handler for the Kitties pallet.
        type Currency: Currency<Self::AccountId>;

        // ACTION #5: Specify the type for Randomness we want to specify for runtime.

        // ACTION #9: Add MaxKittyOwned constant
    }

    // Errors.
    #[pallet::error]
    pub enum Error<T> {
        // TODO Part III
    }

    // Events.
    #[pallet::event]
    #[pallet::generate_deposit(pub(super) fn deposit_event)]
    pub enum Event<T: Config> {
        // TODO Part III
    }

    #[pallet::storage]
    #[pallet::getter(fn all_kitties_count)]
    pub(super) type KittyCnt<T: Config> = StorageValue<_, u64, ValueQuery>;

    // ACTION #7: Remaining storage items.

    // TODO Part IV: Our pallet's genesis configuration.

    #[pallet::call]
    impl<T: Config> Pallet<T> {

        // TODO Part III: create_kitty

        // TODO Part IV: set_price

        // TODO Part IV: transfer

        // TODO Part IV: buy_kitty

        // TODO Part IV: breed_kitty
    }

    //** Our helper functions.**//

    impl<T: Config> Pallet<T> {

        // ACTION #4: helper function for Kitty struct

        // TODO Part III: helper functions for dispatchable functions

        // ACTION #6: funtion to randomly generate DNA

        // TODO Part III: mint

        // TODO Part IV: transfer_kitty_to
    }
}
Scaffold Kitty struct
A Struct in Rust is a useful construct to help store data that have things in common. For our purposes, our Kitty will carry multiple properties which we can store in a single struct instead of using separate storage items. This comes in handy when trying to optimize for storage reads and writes so our runtime can perform less read/writes to update multiple values. Read more about storage best practices here.
What information to include
Let's first go over what information a single Kitty will carry:
dna: the hash used to identify the DNA of a Kitty, which corresponds to its unique features. DNA is also used to breed new Kitties and to keep track of different Kitty generations.price: this is a balance that corresponds to the amount needed to buy a Kitty and set by its owner.gender: an enum that can be eitherMaleorFemale.owner: an account ID designating a single owner.
Sketching out the types held by our struct
Looking at the items of our struct from above, we can deduce the following types:
[u8; 16]fordna- to use 16 bytes to represent a Kitty's DNA.BalanceOfforprice- this is a custom type using FRAME'sCurrencytrait.Genderforgender- we are going to create this!
First, we will need to add in our custom types for BalanceOf and AccountOf before we declare our
struct. Replace ACTION #1 with the following snippet:
type AccountOf<T> = <T as frame_system::Config>::AccountId;
type BalanceOf<T> =
    <<T as Config>::Currency as Currency<<T as frame_system::Config>::AccountId>>::Balance;

// Struct for holding Kitty information.
#[derive(Clone, Encode, Decode, PartialEq, RuntimeDebug, TypeInfo)]
#[scale_info(skip_type_params(T))]
pub struct Kitty<T: Config> {
    pub dna: [u8; 16],
    pub price: Option<BalanceOf<T>>,
    pub gender: Gender,
    pub owner: AccountOf<T>,
}
We define <BalanceOf<T>> and AccountOf<T> types, and use them in the Kitty. If you
wonder what the first line means in Rust, it is to define a type alias AccountOf<T> which is
just a shorthand pointing to the associated type AccountId of trait frame_system::Config
that generic type T is required to be bound of.
More about this type of syntax is covered in the Rust book.
Notice how we use the derive macro to include various helper traits for
using our struct. We'll need to add TypeInfo in order to give our struct access to this trait. Add the
following line at the top of your pallet:
use scale_info::TypeInfo;
For type Gender, we will need to build out our own custom enum and helper
functions. Now is a good time to do that.
Write a custom type for Gender
We have just created a struct that requires a custom type called Gender. This type will handle an
enum defining our Kitty's gender. To create it, you'll build out the following parts:
- An enum declaration, which specifies
MaleandFemalevalues. - Implement a helper function for our Kitty struct.
Declare the custom enum
Replace ACTION item #2 with the following enum declaration:
#[derive(Clone, Encode, Decode, PartialEq, RuntimeDebug, TypeInfo)]
#[scale_info(skip_type_params(T))]
#[cfg_attr(feature = "std", derive(Serialize, Deserialize))]
pub enum Gender {
    Male,
    Female,
}
Notice the use of the derive macro which must precede the enum declaration. This wraps our enum in the data structures it will need to interface with other types in our runtime. In order to use
SerializeandDeserialize, you will need to add theserdecrate inpallets/kitties/Cargo.toml:[dependencies.serde] default-features = false version = '1.0.119'Great, we now know how to create a custom struct. But what about providing a way for a Kitty struct to be assigned a gender value? For that we need to learn one more thing.
Implement a helper function for our Kitty struct
Configuring a struct is useful in order to pre-define a value in our struct. For example, when setting a value in relation to what another function returns. In our case we have a similar situation where we need to configure our Kitty struct in such a way that sets
Genderaccording to a Kitty's DNA.We'll only be using this function when we get to creating Kitties. Regardless, let us learn how to write it now and get it out of the way. We'll create a public function called
gen_genderthat returns theGendertype and uses a random function to choose betweenGenderenum values.Replace ACTION #4 with the following code snippet:
fn gen_gender() -> Gender {
    let random = T::KittyRandomness::random(&b"gender"[..]).0;
    match random.as_ref()[0] % 2 {
        0 => Gender::Male,
        _ => Gender::Female,
    }
}
Now whenever
gen_gender()is called inside our pallet, it will return a pseudo random enum value forGender.
Implement on-chain randomness
If we want to be able to tell these Kitties apart, we need to start giving them unique properties!
In the previous step, we've made use of KittyRandomness which we haven't actually defined yet.
Let's get to it.
We'll be using the Randomness trait from frame_support to do this. It will
be able to generate a random seed which we'll create unique Kitties with as well as breed new
ones.
In order to use the Randomness trait for our pallet, we must:
Define a new type bound by
Randomnesstrait in our pallet's configuration traitThe
Randomnesstrait fromframe_supportrequires specifying it with a paramater to replace theOutputandBlockNumbergenerics. Take a look at the documentation and the source code implementation to understand how this works. For our purposes, we want the output of functions using this trait to beBlake2 128-bit hashwhich you'll notice should already be declared at the top of your working codebase.Replace the ACTION #5 line with:
type KittyRandomness: Randomness<Self::Hash, Self::BlockNumber>;Specify the actual type in our runtime
Given that we have added a new type in the configuration of our pallet, we need to config our runtime to set its concrete type. This could come in handy if ever we want to change the algorithm that
KittyRandomnessis using, without needing to modify where it's used inside our pallet.To showcase this point, we're going to set the
KittyRandomnesstype to an instance of FRAME'sRandomnessCollectiveFlip. Conveniently, the Node Template already has an instance of theRandomnessCollectiveFlippallet. All you need to do is set theKittyRandomnesstype in your runtime, insideruntime/src/lib.rs:impl pallet_kitties::Config for Runtime { type Event = Event; type Currency = Balances; type KittyRandomness = RandomnessCollectiveFlip; // <-- ACTION: add this line. }Programming is about abstraction. Here we have abstracted out the randomness generation implementation (
RandomnessCollectiveFlip) from its interface (Randomness<Self::Hash, Self::BlockNumber>trait). Check out this how-to guide on implementing randomness in case you get stuck.Generating random DNA
Generating DNA is similar to using randomness to randomly assign a gender type. The difference is that we'll be making use of
blake2_128we imported in the previous part. Replace the ACTION #6 line with:fn gen_dna() -> [u8; 16] { let payload = ( T::KittyRandomness::random(&b"dna"[..]).0, <frame_system::Pallet<T>>::block_number(), ); payload.using_encoded(blake2_128) }
Write remaining storage items
Understanding storage item logic
To easily track all of our kitties, we're going to standardize our logic to use a unique ID as the global key for our storage items. This means that a single unique key will point to our Kitty object (i.e. the struct we previously declared).
In order for this to work, we need to make sure that the ID for a new Kitty is always unique. We can do this with a new storage item
Kittieswhich will be a mapping from an ID (Hash) to the Kitty object.With this object, we can easily check for collisions by simply checking whether this storage item already contains a mapping using a particular ID. For example, from inside a dispatchable function we could check using:
ensure!(!<Kitties<T>>::exists(new_id), "This new id already exists");Our runtime needs to be made aware of:
- Unique assets, like currency or Kitties (this will be held by a storgae map called
Kitties) - Ownership of those assets, like account IDs (this will be handled a new storage map called
KittiesOwned)
- Unique assets, like currency or Kitties (this will be held by a storgae map called
Using a
StorageMapTo create a storage instance for the
Kittystruct, we'll be usingStorageMap— a hash-map provided to us by FRAME.Here's what the
Kittiesstorage item looks like:#[pallet::storage] #[pallet::getter(fn kitties)] pub(super) type Kitties<T: Config> = StorageMap< _, Twox64Concat, T::Hash, Kitty<T> >;Breaking it down, we declare the storage type and assign a
StorageMapthat takes:- The
Twox64Concathashing algorithm. - A key of type
T::Hash. - A value of type
Kitty<T>.
The
KittiesOwnedstorage item is similar except that we'll be using aBoundedVecto keep track of some maximum number of Kitties we'll configure inruntime/src/lib.s.#[pallet::storage] #[pallet::getter(fn kitties_owned)] /// Keeps track of what accounts own what Kitty. pub(super) type KittiesOwned<T: Config> = StorageMap< _, Twox64Concat, T::AccountId, BoundedVec<T::Hash, T::MaxKittyOwned>, ValueQuery >;Your turn! Copy the two code snippets above to replace line ACTION #7.
Before we can check our pallet compiles, we need to add a new type
MaxKittyOwnedin the config trait, which is a pallet constant type (similar toKittyRandomnessin the previous steps). Replace ACTION #9 with:#[pallet::constant] type MaxKittyOwned: Get<u32>;Finally, we define
MaxKittyOwnedtype inruntime/src/lib.rs. This is the same pattern as we followed forCurrencyandKittyRandomnessexcept we'll be adding a fixedu32using theparameter_types!macro:parameter_types! { // <- add this macro // One can own at most 9,999 Kitties pub const MaxKittyOwned: u32 = 9999; } /// Configure the pallet-kitties in pallets/kitties. impl pallet_kitties::Config for Runtime { type Event = Event; type Currency = Balances; type KittyRandomness = RandomnessCollectiveFlip; type MaxKittyOwned = MaxKittyOwned; // <- add this line }Now is a good time to check that your Kitties blockchain compiles!
cargo build --releaseRunning into difficulties? Check your solution against the completed helper code for this part of the tutorial.
- The
Dispatchables, events, and errors
In the previous section of this tutorial, we laid down the foundations geared to manage the ownership of our Kitties — even though they don't really exist yet! In this part of the tutorial, we'll be putting these foundations to use by giving our pallet the ability to create a Kitty using the storage items we've declared. Breaking things down a little, we're going to write:
create_kitty: a dispatchable or publicly callable function allowing an account to mint a Kitty.mint(): a helper function that updates our pallet's storage items and performs error checks, called bycreate_kitty.- pallet
Events: using FRAME's#[pallet::event]attribute.
At the end of this part, we'll check that everything compiles without error and call our
create_kitty extrinsic using the PolkadotJS Apps UI.
If you're feeling confident, you can continue building on your codebase from the previous part. Otherwise, refer to our starting base code at here. It also uses various "ACTION" items as a way to assist you through each step.
Public and private functions
Before we dive right in, it's important to understand the pallet design decisions we'll be making around coding up our Kitty pallet's minting and ownership management capabilities.
As developers, we want to make sure the code we write is efficient and elegant. Often times, optimizing for one optimizes for the other. The way we're going to set up our pallet to optimize for both will be to break-up the "heavy lifting" logics into private helper functions. This improves code readability and reusability too. As we'll see, we can create private functions which can be called by multiple dispatchable functions without compromizing on security. In fact, building this way can be considered an additive security feauture. Check out this how-to guide about writing and using helper functions to learn more.
Before jumping into implementing this approach, let's first paint the big picture of what combining dispatchables and helper functions looks like.
create_kitty is a dispatchable function or extrinsic that:
- checks the origin is signed
- generates a random hash with the signing account
- creates a new Kitty object using the random hash
- calls a private
mint()function
mint is a private helper function that:
- checks that the Kitty doesn't already exist
- updates storage with the new Kitty ID (for all Kitties and for the owner's account)
- updates the new total Kitty count for storage and the new owner's account
- deposits an Event to signal that a Kitty has succesfully been created
Write the create_kitty dispatchable
A dispatchable in FRAME always follows the same structure. All pallet
dispatchables live under the #[pallet::call] macro which requires declaring the dispatchables
section with impl<T: Config> Pallet<T> {}. Read the documentation on these
FRAME macros to learn how they work. All we need to know here is that they're a useful feature of
FRAME that minimizes the code required to write for pallets to be properly integrated in a
Substrate chain's runtime.
Weights
As per the requirement for #[pallet::call] described in the its documentation, every dispatchable
function must have an associated weight to it. Weights are an important part of developing with
Substrate as they provide safe-guards around the amount of computation to fit in a block at
execution time.
Substrate's weighting system forces developers to think about the computational complexity each extrinsic carries before it is called so that a node will account for it's worst case, avoiding lagging the network with extrinsics that may take longer than the specified block time. Weights are also intimately linked to the fee system for a signed extrinsic.
For this simple application, we're going to default all weights to 100.
Assuming you've now replaced the contents of pallets/kitties/src/lib.rs with the helper file
for this section, find ACTION #1 and replace it with the following code:
#[pallet::weight(100)]
pub fn create_kitty(origin: OriginFor<T>) -> DispatchResult {
  let sender = ensure_signed(origin)?; // <- add this line
  let kitty_id = Self::mint(&sender, None, None)?; // <- add this line
  // Logging to the console
  log::info!("A kitty is born with ID: {:?}.", kitty_id); // <- add this line

  // ACTION #4: Deposit `Created` event

    Ok(())
}
We won't go into debugging, but logging to the console is a useful tip to make sure your
pallet is behaving as expected. In order to use log::info, add this to your pallet's
Cargo.toml file:
[dependencies.log]
default-features = false
version = '0.4.14'
In create_kitty our return was of type DispatchResult. Since mint() is a helper for
create_kitty, we don't need to overwrite PostDispatchInfo, we can use a return type of
DispatchResult, its unaugmented
version.
Write the mint() function
As seen when we wrote create_kitty in the previous section, we'll need to create mint() for
writing our new unique Kitty object to the various storage items declared in Part II of this
tutorial.
Let's get right to it. Our mint() function will take the following arguments:
owner: of type&T::AccountId- this indicates whom the kitty belongs to.dna: of typeOption<[u8; 16]>- this specifies the DNA of the kitty going to be minted. IfNoneis passed in, a random DNA will be generated.gender: of typeOption<Gender>- ditto.
And it will return Result<T::Hash, Error<T>>.
Paste in the following code snippet to write the mint function, replacing ACTION #2 in the working
codebase:
// Helper to mint a Kitty.
pub fn mint(
  owner: &T::AccountId,
  dna: Option<[u8; 16]>,
  gender: Option<Gender>,
) -> Result<T::Hash, Error<T>> {
  let kitty = Kitty::<T> {
    dna: dna.unwrap_or_else(Self::gen_dna),
    price: None,
    gender: gender.unwrap_or_else(Self::gen_gender),
    owner: owner.clone(),
  };

  let kitty_id = T::Hashing::hash_of(&kitty);

  // Performs this operation first as it may fail
  let new_cnt = Self::kitty_cnt().checked_add(1)
    .ok_or(<Error<T>>::KittyCntOverflow)?;

  // Performs this operation first because as it may fail
  <KittiesOwned<T>>::try_mutate(&owner, |kitty_vec| {
    kitty_vec.try_push(kitty_id)
  }).map_err(|_| <Error<T>>::ExceedMaxKittyOwned)?;

  <Kitties<T>>::insert(kitty_id, kitty);
  <KittyCnt<T>>::put(new_cnt);
  Ok(kitty_id)
}
Let's go over what the above code is doing.
The first thing we're doing is creating a new Kitty object. Then, we create a unique kitty_id
using a hashing funciton based on the current properties of the kitty.
Next, we increment the KittyCnt using the storage getter function Self::kitty_cnt(). We also
checking for overflow with check_add() function.
Once we've done with the check, we proceed with updating our storage items by:
- Making use of
try_mutateto update the kitty's owner vector. - Using the
insertmethod provided by Substrate's StorageMap API to store the actually Kitty object and associate it with itskitty_id. - Using
putprovided by the StorageValue API to store the latest Kitty count.
<Kitties<T>>: Stores a Kitty's unique traits and price, by storing the Kitty object and associating it with its Kitty ID.<KittyOwned<T>>: Keeps track of what accounts own what Kitties.<KittyCnt<T>>: A count of all Kitties in existence.
Implement pallet Events
Our pallet can also emit Events at the end of the function. This not only reports the success of a function's execution, but also tells the "off-chain world" that some particular state transition has happened.
FRAME helps us easily manage and declare our pallet's events using the #[pallet::event]
attribute. With FRAME macros, events are just an enum declared like this:
#[pallet::event]
#[pallet::generate_deposit(pub(super) fn deposit_event)]
pub enum Event<T: Config>{
    /// A function succeeded. [time, day]
    Success(T::Time, T::Day),
}
As you can see in the above snippet, we use attribute macro:
#[pallet::generate_deposit(pub(super) fn deposit_event)]
This allows us to deposit a specifc event using the pattern below:
Self::deposit_event(Event::Success(var_time, var_day));
In order to use events inside our pallet, we need to add a new associated type Event inside our
pallet's configuration trait Config. Additionally — just as when adding any type to our
pallet's Config trait — we also need to define it in our runtime /runtime/src/lib.rs.
This pattern is the same as when we added the KittyRandomness type to our pallet's configuration trait
earlier in this tutorial and has already been included from the
initial scaffolding of our codebase:
  /// Configure the pallet by specifying the parameters and types it depends on.
  #[pallet::config]
  pub trait Config: frame_system::Config {
      /// Because this pallet emits events, it depends on the runtime's definition of an event.
      type Event: From<Event<Self>> + IsType<<Self as frame_system::Config>::Event>;
      //--snip--//
  }
Notice that each event deposit is meant to be informative which is why it carries the various types associated with it.
It's good practice to get in the habit of documenting your event declarations so that your code is easy to read. It is convention to document events as such:
/// Description. [types]
Learn more about events here.
Declare your pallet events by replacing the ACTION #3 line with:
  /// A new Kitty was sucessfully created. \[sender, kitty_id\]
  Created(T::AccountId, T::Hash),
  /// Kitty price was sucessfully set. \[sender, kitty_id, new_price\]
  PriceSet(T::AccountId, T::Hash, Option<BalanceOf<T>>),
  /// A Kitty was sucessfully transferred. \[from, to, kitty_id\]
  Transferred(T::AccountId, T::AccountId, T::Hash),
  /// A Kitty was sucessfully bought. \[buyer, seller, kitty_id, bid_price\]
  Bought(T::AccountId, T::AccountId, T::Hash, BalanceOf<T>),
We'll be using most of these events in the last section of this tutorial. For now let's use
the relevant event for our create_kitty dispatchable.
Complete it by replacing ACTION #4 with:
Self::deposit_event(Event::Created(sender, kitty_id));
If you're building your codebase from the previous part (and haven't been using the helper file
for this part) you'll need to add Ok(()) and properly close the create_kitty dispatchable.
Error handling
FRAME provides us with an error handling system using [#pallet::errors] which allows
us to specify errors for our pallet and use them across our pallet's functions.
Declare all possible errors using the provided FRAME macro under #[pallet::error], replace line
ACTION #5a with:
/// Handles arithemtic overflow when incrementing the Kitty counter.
KittyCntOverflow,
/// An account cannot own more Kitties than `MaxKittyCount`.
ExceedMaxKittyOwned,
/// Buyer cannot be the owner.
BuyerIsKittyOwner,
/// Cannot transfer a kitty to its owner.
TransferToSelf,
/// Handles checking whether the Kitty exists.
KittyNotExist,
/// Handles checking that the Kitty is owned by the account transferring, buying or setting a price for it.
NotKittyOwner,
/// Ensures the Kitty is for sale.
KittyNotForSale,
/// Ensures that the buying price is greater than the asking price.
KittyBidPriceTooLow,
/// Ensures that an account has enough funds to purchase a Kitty.
NotEnoughBalance,
We'll be using these errors once we write the interactive functions in the next section. Notice
that we've already used KittyCntOverflow and ExceedMaxKittyOwned in our mint function.
Now's a good time to see if your chain can compile. Instead of only checking if your pallet compiles, run the following command to see if everything can build:
cargo build --release
If you ran into errors, scroll to the first error message in your terminal, identify what line is giving an error and check whether you've followed each step correctly. Sometimes a mismatch of curly brackets will unleash a whole bunch of errors that are difficult to understand — double check your code!
Did that build fine? Congratulations! That's the core functionality of our Kitties pallet. In the next step you'll be able to see everything you've built so far in action.
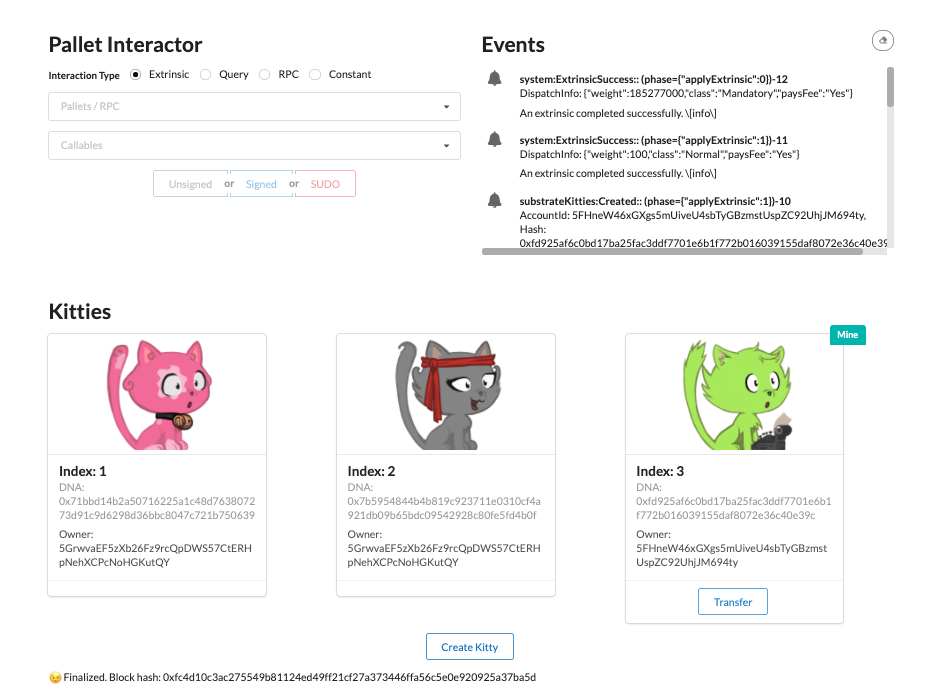
Testing with Polkadot-JS Apps UI
Assuming that you successfully built your chain, let's run it and use the PolkadotJS Apps UI to interact with it.
In your chain's project directory, run:
./target/release/node-kitties --tmp --dev
By doing this, we're specifying to run a temporary chain in developer mode, so as not to need to purge storage each time we want to start a fresh chain.
Assuming that blocks are being finalized (which you should be able to see from the terminal in which you ran the above command), head over to Polkadot.js Apps UI.
Follow these steps:
Check that you're connected to the Local Node. Click on the top left circular network icon, open the "Development" section, and choose "Local Node". Your node is default to be
127.0.0.1.:9944.Tell the Apps about your custom types. This requires you to navigate to the "Settings" -> "Developer" section, and then paste in the editor the following custom types (in JSON format):
{
  "Gender": {
    "_enum": [ "Male", "Female"]
  },
  "Kitty": {
    "dna": "[u8; 16]",
    "price": "Option<Balance>",
    "gender": "Gender",
    "ownder": "AccountId"
  }
}
The reason we need this is because Polkadot-JS Apps isn't designed to read custom types by default. By adding them, it can properly decode each of our storage items that rely on custom types. Add this in a file called
types.jsonin your projectsruntimefolder.Now go to: "Developer" -> "Extrinsics" and submit a signed extrinsic using substrateKitties by calling the
createKitty()dispatchable. Make 3 different transactions from Alice, Bob and Charlie's accounts.Check for the associated event "Created" by going to "Network" -> "Explorer". You should be able to see the events emitted and query their block details.
Check your newly created Kitty's details by going to "Developer" -> "Chain State". Select the substrateKitties pallet and query
Kitties(Hash): Kitty. Note: You'll notice that this is actually querying all of your pallet's storage items!Be sure to uncheck the "include option" box and you should be able to see the details of your newly minted Kitty in the following format:
kitties.kitties: Option<Kitty>
[
  [
    [
      0x15cb95604033af239640125a30c45b671a282f3ef42c6fc48a78eb18464b30a9
    ],
    {
      dna: 0xaf2f2b3f77e110a56933903a38cde1eb,
      price: null,
      gender: Female,
      ownder: 5GrwvaEF5zXb26Fz9rcQpDWS57CtERHpNehXCPcNoHGKutQY
    }
  ]
]
Check that other storage items correctly reflect the creation of additional Kitties.
You're pretty much able to take it from here at this point! We've learnt how to implement the key parts of what powers a FRAME pallet and how to put them to use. In the next section we'll be building on our knowledge by adding more capabilities to our pallet.
To recap, in this part of the tutorial you've learnt how to:
- Distinguish between implementing a dispatchable function and a private helper function.
- Use
#[pallet::call],#[pallet::event]and#[pallet::error]. - Implement basic error checking with FRAME.
- Update values in storage with safety checks.
- Implement FRAME events and use them in a function.
- Query storage items and chain state using the PolkadotJS Apps UI.
Interacting with your Kitties
Up until this point in the tutorial, we've built a chain capable of only creating and tracking the ownership of Kitties. Now that that's done, we want to make our runtime more like a game by introducing other functions like buying and selling Kitties. In order to achieve this, we'll first need to enable users to mark and update the price of their Kitties. Then we can add functionality to enable users to transfer, buy, and breed Kitties.
Set a price for each Kitty
In the helper file for this part of the tutorial,
you'll notice that the structure of set_price is already laid out.
Your job is to replace ACTION lines #1a, #1b, #2 and #3 with what you'll learn in sections A-D below.
A. Checking Kitty Owner
As we create functions which modify objects in storage, we should always check first that only the appropriate users can successfully execute the logics in these dispatchable functions.
The general pattern for an ownership check will look something like this:
let owner = Self::owner_of(object_id).ok_or("No owner for this object")?;

ensure!(owner == sender, "You are not the owner");
The first line checks if Self::owner_of(object_id) return a Some(val). If yes, it is
transformed into Result::Ok(val), and finally extract val out from Result. If not, it is
transformed into Result::Err() with provided error message, and return early with the error
object.
The second line checks if owner == sender. If true, the program execution continues to the next
line. If not, Result::Err("You are not the owner") error object is immediately returned from the
function.
Your turn!
Paste in this code snippet to replace ACTION #1a:
ensure!(Self::is_kitty_owner(&kitty_id, &sender)?, <Error<T>>::NotKittyOwner);
Paste the following in ACTION #1b:
pub fn is_kitty_owner(kitty_id: &T::Hash, acct: &T::AccountId) -> Result<bool, Error<T>> {
    match Self::kitties(kitty_id) {
        Some(kitty) => Ok(kitty.owner == *acct),
        None => Err(<Error<T>>::KittyNotExist)
    }
}
The line pasted in ACTION #1b is actually combining two checks together. In case
Self::is_kitty_owner() returns an error object Err(<Error<T>>::KittyNotExist), it is returned
early with <Error<T>>::KittyNotExist by the ?. If it returns Ok(bool_val), the bool_val
is extracted, and if false, returns <Error<T>>::NotKittyOwner error.
B. Updating the price of our Kitty object
Every Kitty object has a price attribute that we've set to None as a default value inside the
mint function earlier in this tutorial:
let kitty = Kitty::<T> {
  dna: dna.unwrap_or_else(Self::gen_dna),
  price: None,                           //<-- 👀 here
  gender: gender.unwrap_or_else(Self::gen_gender),
  owner: owner.clone(),
};
To update the price of a Kitty, we'll need to:
- Get the Kitty object in storage.
- Update the object with the new price.
- Save it back into storage.
Changing a value in an existing object in storage would be written in the following way:
let mut object = Self::get_object(object_id);
object.value = new_value;

<Object<T>>::insert(object_id, object);
Rust expects you to declare a variable as mutable (using the mut keyword) whenever its value is
going to be updated.
Your turn!
Paste in the following snippet to replace the ACTION #2 line:
kitty.price = new_price.clone();
<Kitties<T>>::insert(&kitty_id, kitty);
D. Deposit an Event
Once all checks are passed and the new price is written to storage, we can deposit an event just like we did before. Replace the line marked as ACTION #3 with:
// Deposit a "PriceSet" event.
Self::deposit_event(Event::PriceSet(sender, kitty_id, new_price));
Now whenever the set_price dispatchable is called successfully, it will emit a PriceSet event.
Transfer a Kitty
Based on the create_kitty function we built earlier, you already have the tools and knowledge
you'll need to create the transfer functionality. The main difference is that there are two parts
to achieving this:
- A dispatchable function called
transfer(): this is a publicly callable dispatchable exposed by your pallet. - A private helper function called
transfer_kitty_to(): this will be a private helper function called bytransfer()to handle all storage updates when transferring a Kitty.
Separating the logic this way makes the private transfer_kitty_to() function reusable by other
dispatchable functions of our pallet without needing to duplicate code. In our case, we're going to
reuse it for the buy_kitty dispatchable we'll be creating next.
transfer
Paste in the following snippet to replace ACTION #4 in the template code:
#[pallet::weight(100)]
pub fn transfer(
    origin: OriginFor<T>,
    to: T::AccountId,
    kitty_id: T::Hash
) -> DispatchResult {
    let from = ensure_signed(origin)?;

    // Ensure the kitty exists and is called by the kitty owner
    ensure!(Self::is_kitty_owner(&kitty_id, &from)?, <Error<T>>::NotKittyOwner);

    // Verify the kitty is not transferring back to its owner.
    ensure!(from != to, <Error<T>>::TransferToSelf);

    // Verify the recipient has the capacity to receive one more kitty
    let to_owned = <KittiesOwned<T>>::get(&to);
    ensure!((to_owned.len() as u32) < T::MaxKittyOwned::get(), <Error<T>>::ExceedMaxKittyOwned);

    Self::transfer_kitty_to(&kitty_id, &to)?;

    Self::deposit_event(Event::Transferred(from, to, kitty_id));

    Ok(())
}
By now the above pattern should be familiar. We always check that the transaction is signed; then we verify that:
- The Kitty being transferred is owned by the sender of this transaction;
- The Kitty is not transferred to its owner (a redundant operation);
- The recipient has the capacity to receive one more kitty;
Lastly we call the transfer_kitty_to helper to update all storage items appropriately.
transfer_kitty_to
The transfer_kitty_to function will be a helper to perform all storage updates once a Kitty
is transferred (and it is going to be called when a kitty is bought and sold too). All it needs to
do is perform safety checks and update the following storage items:
KittiesOwned: to update the owner of the Kitty.Kitties: to reset the price in the Kitty object toNone.
Copy the following to replace ACTION #5:
#[transactional]
pub fn transfer_kitty_to(
    kitty_id: &T::Hash,
    to: &T::AccountId,
) -> Result<(), Error<T>> {
    let mut kitty = Self::kitties(&kitty_id).ok_or(<Error<T>>::KittyNotExist)?;

    let prev_owner = kitty.owner.clone();

    // Remove `kitty_id` from the KittyOwned vector of `prev_kitty_owner`
    <KittiesOwned<T>>::try_mutate(&prev_owner, |owned| {
        if let Some(ind) = owned.iter().position(|&id| id == *kitty_id) {
            owned.swap_remove(ind);
            return Ok(());
        }
        Err(())
    }).map_err(|_| <Error<T>>::KittyNotExist)?;

    // Update the kitty owner
    kitty.owner = to.clone();
    // Reset the ask price so the kitty is not for sale until `set_price()` is called
    // by the current owner.
    kitty.price = None;

    <Kitties<T>>::insert(kitty_id, kitty);

    <KittiesOwned<T>>::try_mutate(to, |vec| {
        vec.try_push(*kitty_id)
    }).map_err(|_| <Error<T>>::ExceedMaxKittyOwned)?;

    Ok(())
}
Notice the use of #[transactional]
which we imported at the very beginning of this tutorial. It allows us to write dispatchable
functions that commit changes to the storage only if the annotated function returns Ok. Otherwise
all changes are discarded.
Buy a Kitty
A. Check a Kitty is for sale
We'll need to ensure two things before we can allow the user of this function to purchase a Kitty:
- Check that the Kitty is for sale;
- Check whether the Kitty's current price is within the user's budget and whether the user has enough free balance.
Replace line ACTION #6:
// Check the kitty is for sale and the kitty ask price <= bid_price
if let Some(ask_price) = kitty.price {
    ensure!(ask_price <= bid_price, <Error<T>>::KittyBidPriceTooLow);
} else {
    Err(<Error<T>>::KittyNotForSale)?;
}

// Check the buyer has enough free balance
ensure!(T::Currency::free_balance(&buyer) >= bid_price, <Error<T>>::NotEnoughBalance);
In a similar vain, we have to verify whether the user has the capacity to receive a Kitty —
remember we're using a BoundedVec
that can only hold a fixed number of Kitties, defined in our pallet's MaxKittyOwned constant. Replace
ACTION #7 with:
// Verify the buyer has the capacity to receive one more kitty
let to_owned = <KittiesOwned<T>>::get(&buyer);
ensure!((to_owned.len() as u32) < T::MaxKittyOwned::get(), <Error<T>>::ExceedMaxKittyOwned);

let seller = kitty.owner.clone();
B. Making a payment
In Step 2, we added the functions necessary to transfer the ownership of our Kitties. But we haven't yet touched on the currrency system associated to our pallet.
In this step we'll learn how to use FRAME's Currency trait to adjust
account balances using its transfer method. It's useful to
understand why it's important to use the transfer method in particular and how we'll be accessing
it:
The reason we'll be using it is to ensure our runtime has the same understanding of currency throughout the pallets it interacts with. The way that we ensure this is to use the
Currencytrait given to us byframe_support.Conveniently, it handles a
Balancetype, making it compatible withBalanceOftype we created forkitty.price. Take a look at how thetransferfunction we'll be using is structured:fn transfer( source: &AccountId, dest: &AccountId, value: Self::Balance, existence_requirement: ExistenceRequirement ) -> DispatchResult
Now we can make use of the Currency type in our pallet's Config trait and ExistenceRequirement
that we initially started with in the first section.
Update the balances of both the caller of this function and the receiver, replacing ACTION #8:
// Transfer the amount from buyer to seller
T::Currency::transfer(&buyer, &seller, bid_price, ExistenceRequirement::KeepAlive)?;

// Transfer the kitty from seller to buyer
Self::transfer_kitty_to(&kitty_id, &buyer)?;

// Deposit relevant Event
Self::deposit_event(Event::Bought(buyer, seller, kitty_id, bid_price));
Both of the above operations, T::Currency::transfer(), and Self::transfer_kitty_to() could
fail which is why we check for the returned result in each case. If Err is returned, we also return from the
function immediately. In order to keep the storage consistent, we also annotate this function as
#[transactional].
Breed Kitties
The logic behind breeding two Kitties is to multiply each corresponding DNA segment from two Kitties, which will produce a new DNA sequence. Then, that DNA is used when minting a new Kitty. This helper function is already provided for you in the template file for this section.
Paste in the following to complete the breed_kitty function, replacing line ACTION #9:
let new_dna = Self::breed_dna(&parent1, &parent2)?;
Don't forget to add breed_dna(&parent1, &parent2) helper function (peep it's definition in the helper file)
Now that we've used the user inputs of Kitty IDs and combined them to create a new unique Kitty ID,
we can use the mint() function to write that new Kitty to storage. Replace line ACTION #10 to
complete the breed_kitty extrinsic:
Self::mint(&sender, Some(new_dna), None)?;
Genesis configuration
The final step before our pallet is ready to be used is to set the genesis state of our storage
items. We'll make use of FRAME's #[pallet::genesis_config] to do this. Essentially, this allows us
to declare what the Kitties object in storage contains in the genesis block.
Copy the following code to replace ACTION #11:
// Our pallet's genesis configuration.
#[pallet::genesis_config]
pub struct GenesisConfig<T: Config> {
    pub kitties: Vec<(T::AccountId, [u8; 16], Gender)>,
}

// Required to implement default for GenesisConfig.
#[cfg(feature = "std")]
impl<T: Config> Default for GenesisConfig<T> {
    fn default() -> GenesisConfig<T> {
        GenesisConfig { kitties: vec![] }
    }
}

#[pallet::genesis_build]
impl<T: Config> GenesisBuild<T> for GenesisConfig<T> {
    fn build(&self) {
        // When building a kitty from genesis config, we require the dna and gender to be supplied.
        for (acct, dna, gender) in &self.kitties {
            let _ = <Pallet<T>>::mint(acct, Some(dna.clone()), Some(gender.clone()));
        }
    }
}
To let our chain know about our pallet's genesis configuration, we need to modify the
chain_spec.rs file in our project's node folder. It's important you make sure you use
the name of the pallet instance in runtime/src/lib.rs, which in our case was SubstrateKitties.
Go to node/src/chain_spec.rs, add use node_kitties_runtime::SubstrateKittiesConfig; at the
top of the file and add the following snippet inside the testnet_genesis function:
//-- snip --
        substrate_kitties: SubstrateKittiesConfig {
            kitties: vec![],
        },
//-- snip --
Build, run and interact with your Kitties
If you've completed all of the preceding parts and steps of this tutorial, you're ready to run your chain and start interacting with all the new capabilities of your Kitties pallet!
Build and run your chain using the following commands:
cargo build --release
./target/release/node-kitties --dev --tmp
Now check your work using the Polkadot-JS Apps just like we did previously. Once your chain is running and connected to the PolkadotJS Apps UI, perform these manual checks:
- Fund multiple users with tokens so they can all participate
- Have each user create multiple Kitties
- Try to transfer a Kitty from one user to another using the right and wrong owner
- Try to set the price of a Kitty using the right and wrong owner
- Buy a Kitty using an owner and another user
- Use too little funds to purchase a Kitty
- Overspend on the cost of the Kitty and ensure that the balance is reduced appropriately
- Breed a Kitty and check that the new DNA is a mix of the old and new
After all of these actions, confirm that all users have the correct number of Kitties; that the total Kitty count is correct; and any other storage variables are correctly represented.
You've successfully created the backend of a fully functional Substrate chain capable of creating and managing Substrate Kitties. The basic capabilities of our Kitties application could also be abstracted to other NFT-like use cases. Most importantly, at this point in the tutorial you should have all the knowledge you need to start creating your own pallet logics and dispatchable functions.
Next Steps
Move on to Part II to connect your chain to the front-end template and create a user interface to visualize and interact with your Kitties!