Start a Permissioned Network
Introduction
In this tutorial, you will learn how to build a permissioned network with Substrate by using the node-authorization pallet. This tutorial should take you about 1 hour to complete.
You are probably already familiar with public or permissionless blockchain, where everyone is free to join the network by running a node. In a permissioned network, only authorized nodes are allowed to perform specific activities, like validate blocks and propagate transactions. Some examples of where permissioned blockchains may be desired:
- Private (or consortium) networks
- Highly regulated data environments (healthcare, B2B ledgers, etc.)
- Testing pre-public networks at scale
Before you start, we expect that:
- You have completed the Build a PoE Decentralized Application Tutorial.
- You are conceptually familiar with P2P Networking in Substrate. We recommend completing the Private Network Tutorial to get experience with this first.
If you run into an issue on this tutorial, we are here to help! You can
ask a question on Stack Overflow and use the
substrate tag or contact us on Element.
What You Will Be Doing
Before we get started, let's layout the objectives of this tutorial:
1. Modify the Node Template project to add `node-authorization pallet`.
2. Launch multiple nodes and authorize new nodes to join.
Learning outcomes
- Learn how to use the node-authorization pallet in your runtime
- Learn how to create a permissioned network consisting of multiple nodes
Add node-authorization pallet
The node-authorization pallet is a built-in pallet in Substrate's FRAME, which manages
a configurable set of nodes for a permissioned network.
Each node is identified by a PeerId which is simply a wrapper on Vec<u8>.
Each PeerId is owned by an AccountId that claims it
(these are
associated in a map
). With this pallet, you have two ways to authorize a node which wants to join the network:
- Join the set of well known nodes between which the connections are allowed. You need to be approved by the governance (or sudo) in the system for this.
- Ask for a paired peer connection from a specific node. This node can either be a well known node or a normal one.
A node associated with a PeerId must have one and only one owner.
The owner of a well known node is specified when adding it.
If it's a normal node, any user can claim a PeerId as its owner.
To protect against false claims, the maintainer of the node should claim it
before even starting the node and therefor revealing their PeerID to the network that
anyone could subsequently claim.
The owner of a node can then add and remove connections for their node. To be clear, you can't change the connections between well known nodes, they are always allowed to connect with each other. Instead, you can manipulate the connection between a well known node and a normal node or between two normal nodes and sub-nodes.
The node-authorization pallet integrates an
offchain worker
to configure it's node connections. Make sure to enable offchain worker with
the right CLI flag as offchain worker is disabled by default for non-authority nodes.
Your node may not be synced with the latest block, and thus not be aware of and published updates that are
reflected in the node-authorization chain storage. You may need to disable offchain worker
and manually set reachable reserved nodes for your node to sync up with the network if this is the case.
Build the Node Template
If you already have Node Template cloned, you can just create a check out of the v3.0.0 branch from the base template, otherwise, clone this branch of the project:
# Fresh clone, if needed:
git clone -b v3.0.0 --depth 1 https://github.com/substrate-developer-hub/substrate-node-template
# From the working directory, create a new branch and check it out
cd substrate-node-template
git branch perm-network
git checkout perm-network
You should be able to build the project (or check) without any error:
cd substrate-node-template/
cargo build --release
If you do run into issues building, checkout these helpful tips.
Now open the code with your favorite editor, and let's make some changes.
Add the node-authorization pallet
First we must add the pallet to our runtime dependencies:
runtime/Cargo.toml
[dependencies]
#--snip--
pallet-node-authorization = { default-features = false, version = '3.0.0' }

#--snip--
[features]
default = ['std']
std = [
    #--snip--
    'pallet-node-authorization/std',
    #--snip--
]
We need to simulate the governance in our simple blockchain, so we just let a sudo admin rule,
configuring the pallet's interface to EnsureRoot. In a production environment we sould want to have
difference, governance based checking implemented here. More details of this Config can be found in
the pallet's
reference docs.
runtime/src/lib.rs
/* --snip-- */

use frame_system::EnsureRoot;

/* --snip-- */

parameter_types! {
    pub const MaxWellKnownNodes: u32 = 8;
    pub const MaxPeerIdLength: u32 = 128;
}

impl pallet_node_authorization::Config for Runtime {
    type Event = Event;
    type MaxWellKnownNodes = MaxWellKnownNodes;
    type MaxPeerIdLength = MaxPeerIdLength;
    type AddOrigin = EnsureRoot<AccountId>;
    type RemoveOrigin = EnsureRoot<AccountId>;
    type SwapOrigin = EnsureRoot<AccountId>;
    type ResetOrigin = EnsureRoot<AccountId>;
    type WeightInfo = ();
}

/* --snip-- */
Finally, we are ready to put our pallet in construct_runtime macro with following extra line of code:
runtime/src/lib.rs
construct_runtime!(
    pub enum Runtime where
        Block = Block,
        NodeBlock = opaque::Block,
        UncheckedExtrinsic = UncheckedExtrinsic
    {
        /* --snip-- */

        /*** Add This Line ***/
        NodeAuthorization: pallet_node_authorization::{Pallet, Call, Storage, Event<T>, Config<T>},

        /* --snip-- */

    }
);
Add genesis storage for our pallet
PeerId is encoded in bs58 format, so we need a new library
bs58 in node/Cargo.toml to decode it to get its bytes.
node/cargo.toml
[dependencies]
#--snip--
bs58 = "0.4.0"
#--snip--
Now we add a proper genesis storage in node/src/chain_spec.rs. Similarly, import the necessary dependencies:
node/src/chain_spec.rs
/* --snip-- */
use sp_core::OpaquePeerId; // A struct wraps Vec<u8>, represents as our `PeerId`.
use node_template_runtime::NodeAuthorizationConfig; // The genesis config that serves for our pallet.
/* --snip-- */
Adding our genesis config in the helper function testnet_genesis,
node/src/chain_spec.rs
/// Configure initial storage state for FRAME modules.
fn testnet_genesis(
    wasm_binary: &[u8],
    initial_authorities: Vec<(AuraId, GrandpaId)>,
    root_key: AccountId,
    endowed_accounts: Vec<AccountId>,
    _enable_println: bool,
) -> GenesisConfig {

    /* --snip-- */

    /*** Add This Block Item ***/
        node_authorization: NodeAuthorizationConfig {
            nodes: vec![
                (
                    OpaquePeerId(bs58::decode("12D3KooWBmAwcd4PJNJvfV89HwE48nwkRmAgo8Vy3uQEyNNHBox2").into_vec().unwrap()),
                    endowed_accounts[0].clone()
                ),
                (
                    OpaquePeerId(bs58::decode("12D3KooWQYV9dGMFoRzNStwpXztXaBUjtPqi6aU76ZgUriHhKust").into_vec().unwrap()),
                    endowed_accounts[1].clone()
                ),
            ],
        }),

    /* --snip-- */

}
NodeAuthorizationConfig contains a property named nodes, which is vector of tuple.
The first element of the tuple is the OpaquePeerId and we use bs58::decode to convert
the PeerId in human readable format to bytes. The second element of the tuple is AccountId
and represents the owner of this node, here we are using one of the provided endowed accounts
for demonstration: Alice and Bob.
You may wondering where the 12D3KooWBmAwcd4PJNJvfV89HwE48nwkRmAgo8Vy3uQEyNNHBox2 comes from.
We can use subkey to generate
the above human readable PeerId.
subkey generate-node-key
subkey is a CLI tool that comes bundled with substrate, and you can install it natively too! Refer to the install Instructions.
The output of the command is like:
12D3KooWBmAwcd4PJNJvfV89HwE48nwkRmAgo8Vy3uQEyNNHBox2 // this is PeerId.
c12b6d18942f5ee8528c8e2baf4e147b5c5c18710926ea492d09cbd9f6c9f82a // This is node-key.
Now all the code changes are finished, we are ready to launch our permissioned network!
Stuck? The solution with all required changes to the base template can be found ', here.',
In the next section, we will use well-known node keys and Peer IDs to launch your permissioned network and allow access for other nodes to join.
Launch our Permissioned Network
In this part, we will demonstrate how to launch and add new nodes to our permissioned chain.
Let's first make sure everything compiles:
# from the root dir of your node template:
cargo build --release
For this demonstration, we'll launch 4 nodes: 3 well known nodes that are allowed to author and validate blocks, and 1 sub-node that only has read-only access to data from a selected well-known node (upon it's approval).
Obtaining Node Keys and PeerIDs
For Alice's well known node:
# node key
c12b6d18942f5ee8528c8e2baf4e147b5c5c18710926ea492d09cbd9f6c9f82a

# peerid, generated from node key
12D3KooWBmAwcd4PJNJvfV89HwE48nwkRmAgo8Vy3uQEyNNHBox2

# bs58 decoded peer id in hex:
0024080112201ce5f00ef6e89374afb625f1ae4c1546d31234e87e3c3f51a62b91dd6bfa57df
For Bob's well known node:
# node key
6ce3be907dbcabf20a9a5a60a712b4256a54196000a8ed4050d352bc113f8c58

# peer id, generated from node key
12D3KooWQYV9dGMFoRzNStwpXztXaBUjtPqi6aU76ZgUriHhKust

# bs58 decoded peer id in hex:
002408011220dacde7714d8551f674b8bb4b54239383c76a2b286fa436e93b2b7eb226bf4de7
For Charlie's NOT well known node:
# node key
3a9d5b35b9fb4c42aafadeca046f6bf56107bd2579687f069b42646684b94d9e

# peer id, generated from node key
12D3KooWJvyP3VJYymTqG7eH4PM5rN4T2agk5cdNCfNymAqwqcvZ

# bs58 decoded peer id in hex:
002408011220876a7b4984f98006dc8d666e28b60de307309835d775e7755cc770328cdacf2e
For Dave's sub-node (to Charlie, more below):
# node key
a99331ff4f0e0a0434a6263da0a5823ea3afcfffe590c9f3014e6cf620f2b19a

# peer id, generated from node key
12D3KooWPHWFrfaJzxPnqnAYAoRUyAHHKqACmEycGTVmeVhQYuZN

# bs58 decoded peer id in hex:
002408011220c81bc1d7057a1511eb9496f056f6f53cdfe0e14c8bd5ffca47c70a8d76c1326d
The nodes of Alice and Bob are already configured in genesis storage and serve as well known nodes. We will later add Charlie's node into the set of well known nodes. Finally we will add the connection between Charlie's node and Dave's node without making Dave's node as a well known node.
You can get the above bs58 decoded peer id by using bs58::decode similar', to how it was used in our genesis storage configuration. Alternatively, there are tools online like ', this one to en/decode bs58 IDs.
Alice and Bob Start the Network
Let's start Alice's node first:
./target/release/node-template \
--chain=local \
--base-path /tmp/validator1 \
--alice \
--node-key=c12b6d18942f5ee8528c8e2baf4e147b5c5c18710926ea492d09cbd9f6c9f82a \
--port 30333 \
--ws-port 9944
Here we are using --node-key to specify the key that are used for the security
connection of the network. This key is also used internally to generate the human
readable PeerId as shown in above section.
Other used CLI flags are:
--chain=localfor a local testnet (not the same as the--devflag!).--aliceto make the node an authority which can author and finalize block, also give the node a name which isalice.--portassign a port for peer to peer connection.--ws-portassign a listening port for WebSocket connection.
You can get the detailed description of above flags and more by running ./target/release/node-template -h.
Start Bob's node:
# In a new terminal, leave Alice running
./target/release/node-template \
--chain=local \
--base-path /tmp/validator2 \
--bob \
--node-key=6ce3be907dbcabf20a9a5a60a712b4256a54196000a8ed4050d352bc113f8c58 \
--port 30334 \
--ws-port 9945
After both nodes are started, you should be able to see new blocks authored and
finalized in bother terminal logs. Now let's use the
polkadot.js apps
and check the well known nodes of our blockchain. Don't forget to switch to one of
our local nodes running: 127.0.0.1:9944 or 127.0.0.1:9945.
Firstly, we need to add an extra setting to tell the frontend the type of the PeerId used
in node-authorization pallet. Note: the format of PeerId here is a wrapper on bs58 decoded
peer id in bytes. Go to the Settings Developer
page in apps
, add following custom type mapping
information:
// add this as is, or with other required types you have set already:
{
  "PeerId": "(Vec<u8>)"
}
If you don't do this, you will get extrinsic errors of the form: Verification Error: Execution(ApiError(Could not convert parameter 'tx' between node and runtime). More details here.
Then, let's go to Developer page, Chain State sub-tab, and check the data
stored in the nodeAuthorization pallet, wellKnownNodes storage. You should be
able to see the peer ids of Alice and Bob's nodes, prefixed with 0x to show its
bytes in hex format.
We can also check the owner of one node by querying the storage owners with the
peer id of the node as input, you should get the account address of the owner.

Add Another Well Known Node
Let's start Charlie's node,
./target/release/node-template \
--chain=local \
--base-path /tmp/validator3 \
--name charlie  \
--node-key=3a9d5b35b9fb4c42aafadeca046f6bf56107bd2579687f069b42646684b94d9e \
--port 30335 \
--ws-port=9946 \
--offchain-worker always
The node-authorization pallet integrates an offchain worker to configure node connections. As Charlie is not yet a well-known node, and we intend to attach Dave's node, we require the offchain worker to be enabled.
After it was started, you should see there are no connected peers for this node.
This is because we are trying to connect to a permissioned network, you need to
get authorization to to be connectable! Alice and Bob were configured already in
the genesis chain_spec.rs, where all others mut be added manually via extrinsic.
Remember that we are using sudo pallet for our governance, we can make a sudo call
on add_well_known_node dispatch call provided by node-authorization pallet to add
our node. You can find more avaliable calls in this
reference doc.
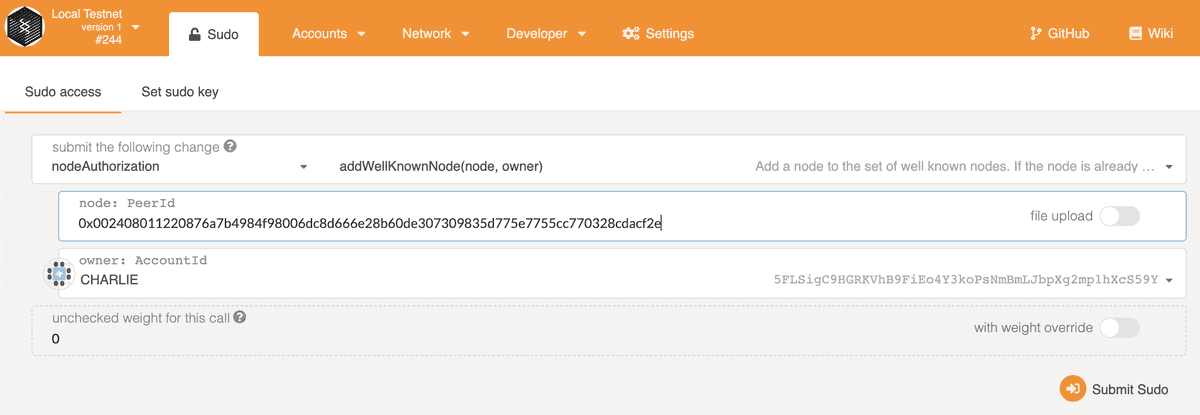
Go to Developer page, Sudo tab, in apps and submit the nodeAuthorization -
add_well_known_node call with the peer id in hex of Charlie's node and the
owner is Charlie, of course. Note Allice is the valid sudo origin for this call.

After the transaction is included in the block, you should see Charlie's node is connected to Alice and Bob's nodes, and starts to sync blocks. Notice the reason the three nodes can find each other is mDNS discovery mechanism is enabled by default in a local network.
If your nodes are not on the same local network, you don't need mDNS and should use --no-mdns to disable it. If running node in a public internet, you need to use --no-mdns to disable it. If running node in a public internet, you need to use Otherwise put the reachable nodes as bootnodes of Chain Spec.
Now we have 3 well known nodes all validating blocks together!
Add Dave as a Sub-Node to Charlie
Let's add Dave's node, not as a well-known node, but a "sub-node" of Charlie. Dave will only be able to connect to Charlie to access the network. This is a security feature: as Charlie is therefor solely responsible for any connected sub-node peer. There is one point of access control for David in case they need to be removed or audited.
Start Dave's node with following command:
./target/release/node-template \
--chain=local \
--base-path /tmp/validator4 \
--name dave \
--node-key=a99331ff4f0e0a0434a6263da0a5823ea3afcfffe590c9f3014e6cf620f2b19a \
--port 30336 \
--ws-port 9947 \
--offchain-worker always
After it was started, there is no available connections. This is a permissioned network, so first, Charlie needs to configure his node to allow the connection from Dave's node.
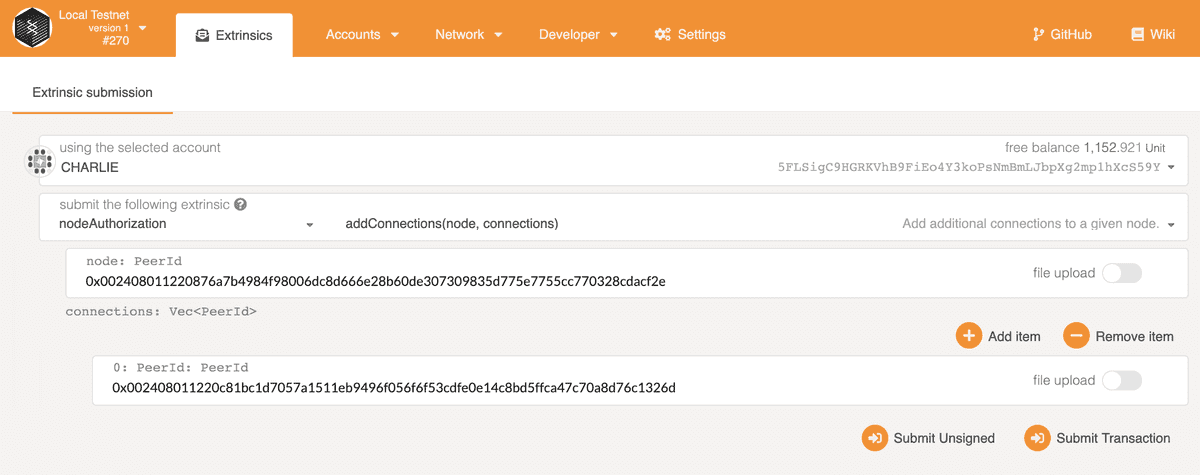
In the Developer Extrinsics page, get Charlie to submit an addConnections extrinsic.
The first PeerId is the peer id in hex of Charlie's node. The connections is a list
of allowed peer ids for Charlie's node, here we only add Dave's.

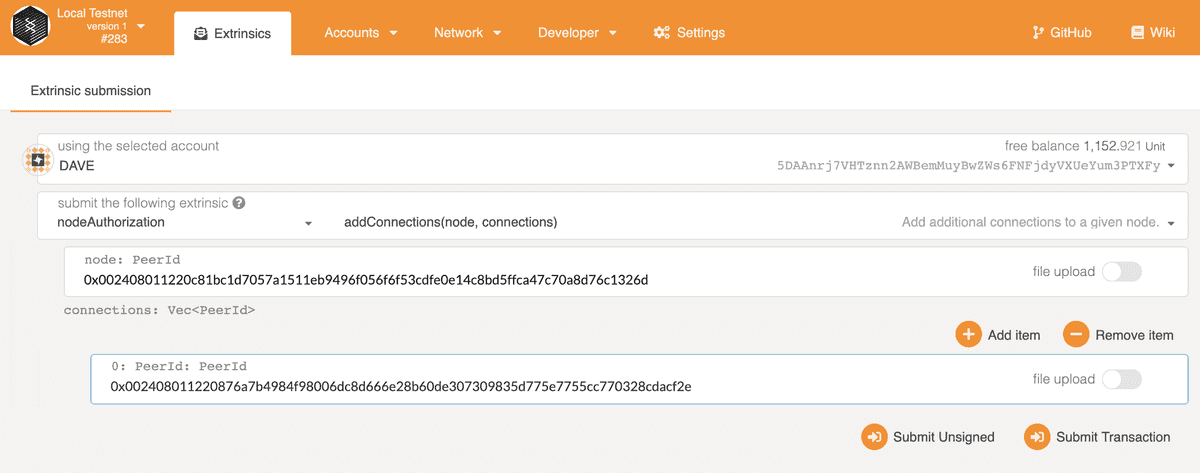
Then, Dave needs to configure his node to allow the connection from Charlie's node. But before he adds this, Dave needs to claim his node, hopefully it's not too late!

Similarly, Dave can add connection from Charlie's node.

You should now see Dave is catching up blocks and only has one peer which belongs to Charlie! Restart Dave's node in case it's not connecting with Charlie right away.
Any node may issue extrinsics that effect other node's behavior, as long as it is on chain data that is used for reference, and you have the singing key in the keystore available for the account in question for the extrinsics' required origin. All nodes in this demonstration have access to the developer signing keys, thus we were able to issue commands that effected Chalie's sub-nodes from any connected node on our network on behalf of Charlie. In a real world application, node operators would only have access to their node keys, and would be the only ones able to sign and submit extrinsics properly, very likely from their own node where they have control of the key's security.
Congratulations!
You are at the end of this tutorial and are already learned about how to build a
permissioned network. You can also play with other dispatchable calls like
remove_well_known_node, remove_connections.
Next steps
- Complete the Private Network Tutorial
- Read more about the Subkey tool